Search this blog

Are you looking for a pattern? Just type the name of the character and let Google find it for you ;)

Saturday, May 30, 2015

Playing catch up (and a link party)

I am baaaaaaaaaack!
Visitors in the house are fun... but they leave no time for sewing :) so I am a little behind with several projects, but I am catching up!


The Ongoing Project List:
  1. SYS2015 future projects - done the next object (cannot share)!
  2. SYS2015, current project - bag done (see below) this is my project for A Lovely Year of Finishes - May
  3. Block Swap Adventure - April and May blocks done (see below)
  4. Mirror Mirror Afghan - 2 blocks done, started the 'main panel' but will share that next week
  5. Water Lilies (Spangled Stars Quilt-along) - done with this week task (see below)
  6. D wall hanging -  no progress
  7. B quilt - no progress
  8. the SK project - no progress
The EverythingElse List:
  1. Embroidery calendar - no progress
  2. Animal blocks for charity quilts - paused for a while
  3. Project of Doom 2015 @ Fandom in Stitches - paused for a while
  4. College Days Blog Hop blocks for tote/grocery bag -  no progress
  5. Alice in Wonderland quilt - no progress
  6. As You Wish -  no progress
  7. Happy Halloween wall hanging -  no progress
  8. Crazy optical illusion -  no progress
  9. Memory quilt 2 - no progress.
--
Susan (quiltfabrication.blogspot.com) is hosting a fun Quilt Along (Spangled Stars)!! I wanted to join but the QAL started exactly during my time off-sewing so I need to catch up with them! But I completed this week task!

As I don't have a design wall here in my living room, I tried to use my sewing helper as a design wall ;). It worked out fine, except that a couple of times I had to chase my blocks around the house :D :D


After that incident I decided that maybe a virtual design wall is a better choice ;)
So below you can see the overall design and my progress!

So this is my current plan
my current draft: modified layout for colors/size

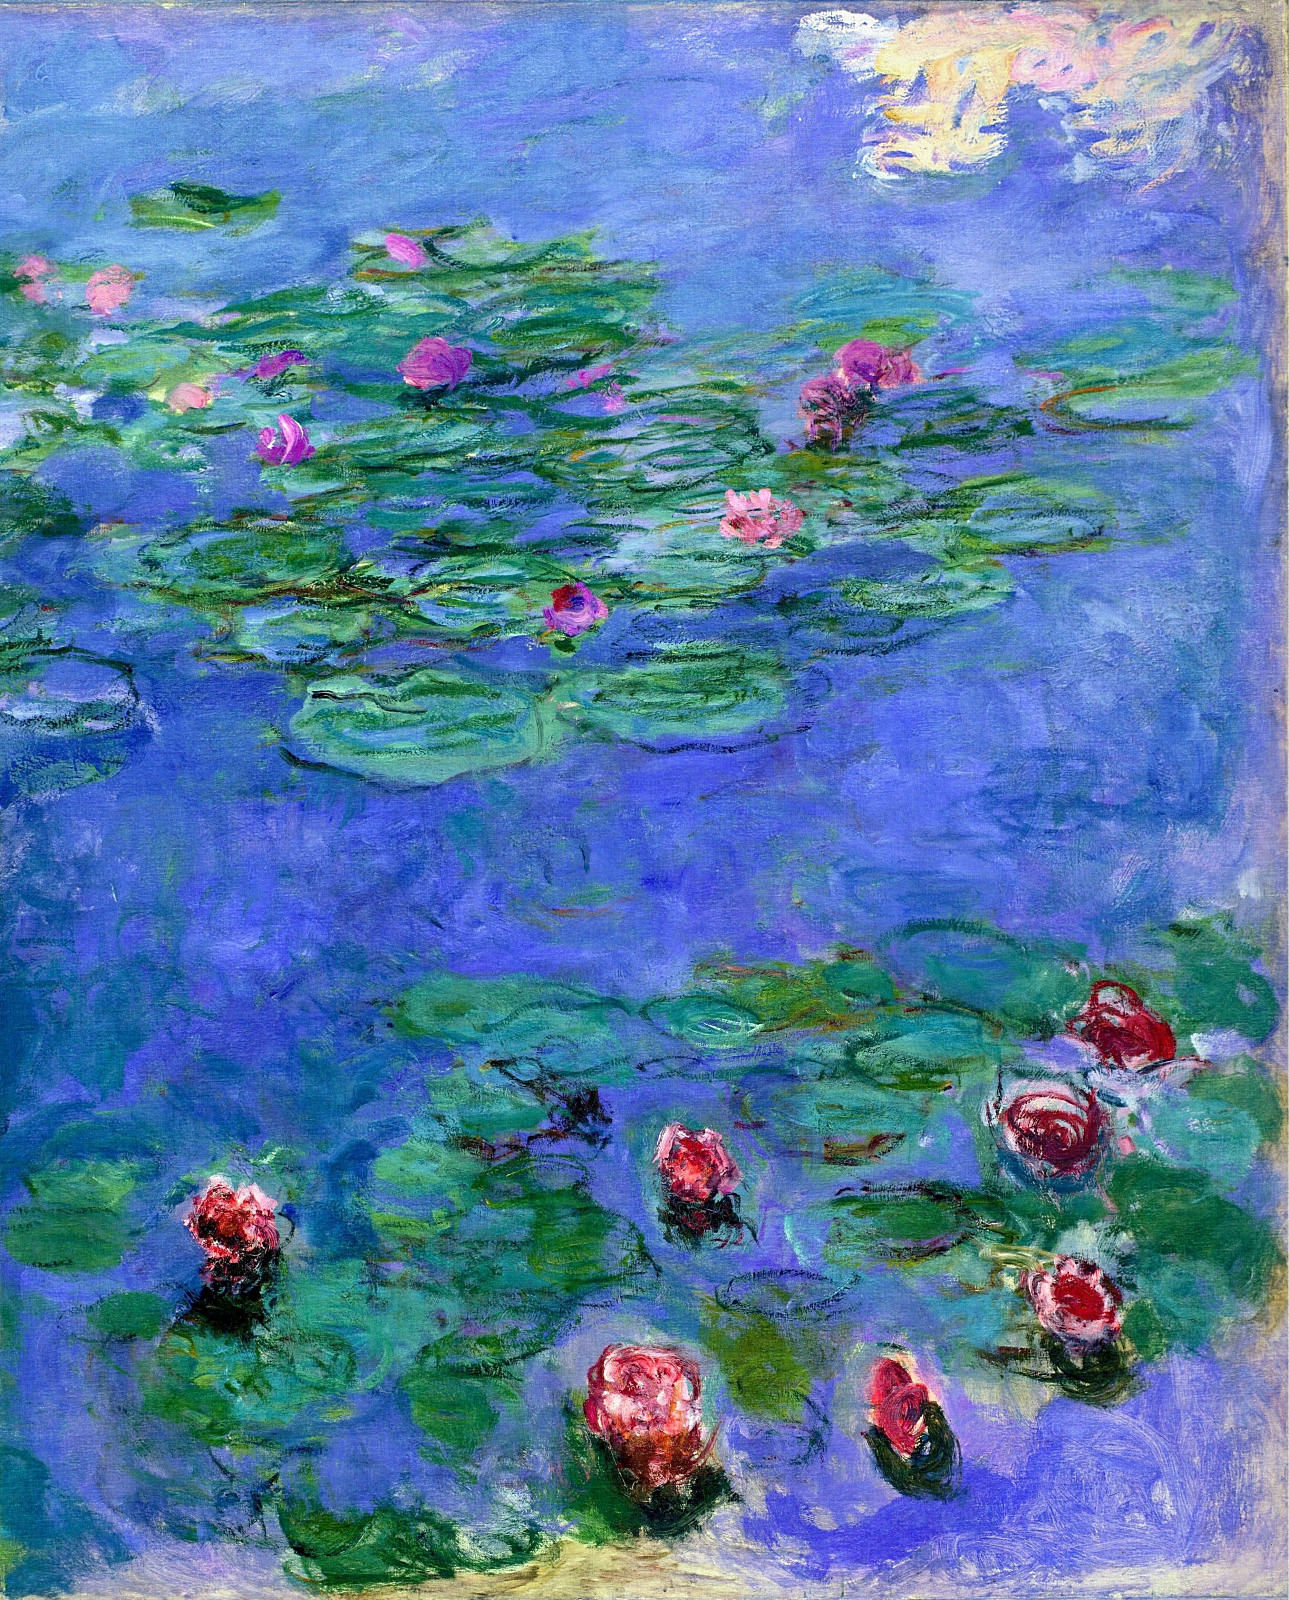
I named this quilt "Water Lilies" because it reminds me of Monet's paintings of Water Lilies (the one below in particular). I hope the final effect of gradient and scrappyiness will work... we'll see!!

--
And I just received the two prizes I won in Sew Mama Sew giveaway days!
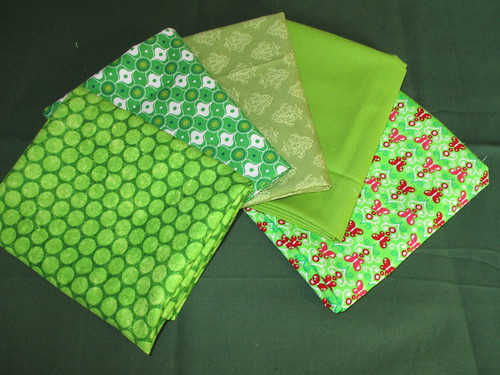
From Leo

From Stacey

The green fabric has already put to good use in the Water Lilies quilt ;) the clothing book is something I will read and see if I am brave enough to try some of those pieces (they look all very cool)

--
Progress on my Mirror Mirror Afghan (using the tapestry crochet technique)
I really like this project, it is the perfect activity to do at night watching tv! And since it's going to be a sampler afghan, I can really play around with colors and designs!!

--
Blocks for the Block Swap Adventure are flying in and out :)

Top: the ones I received from Debra (left) and Kerry (right)
Bottom: the ones I sent to Debra (left) and Kerry (right)

--
And last, but not least... I finished my Pixel Bag!! YEEEEEAH!!! My goal was to finish it by the end of May and I made it!! I am soooooooooo in love with my new beach bag!!
Of course, I couldn't simply follow the instructions that Susan gave us for the SYS2015 May project. I made a single strap (instead of two) and I made it adjustable because when we are carrying thing to the beach sometimes two hands are not enough, so cross body may be easy to have!
And the thing I hate in bags is when you cannot close them! so I added a recessed zipper: first time ever, I am pretty happy with the result... I followed a tutorial, made few mistakes but I think it turned out just fine!!

The bag is really big!! (20''x20''x6'')
Top: the two sides of the bag
Bottom (left): inside you can fit two bottles, a little lunch insulated box, towels and there is a lot more space to get a quilt inside too!! 
Bottom (right): the recessed zipper and the adjustable strap. The lining is home decor fabric.

--
How about you? What are YOU up to?
Link it here and share it with me!!

Thursday, May 28, 2015

My Tangle Thursday - Week 18, 19

Some breaks here and there with my craftying and my drawing. 
But I am up to speed with Jane now!


My favorites are still the  stacked tangles! Because even if each section is completely different than the one next to it, they maintain a coherent and fun overall look... and I am still pretty bad in free hand circles ;)

Wednesday, May 27, 2015

SYS 2015 - Concluding remarks on pixel quilts


At the beginning of the month Susan shared an amazing tutorial for a pixel bag to stretch your skills in stitching small squares :).
You can find the tutorial on the SYS2015 page!


So have you been enjoying this technique?
I absolutely love it! And I already planned a couple of future project that will use this approach.
I will go down to 1'' square UNfinished (meaning 0.5'' finished! yes! isn't it crazy!?! stay tuned to see how it turns out) ;)

So get your squares together and add YOUR projects to the link party!!

Remember that in this link party only projects belonging to the SYS2015 series should be added 
(I reserve the right to delete any non compliant link). 
This link party will be open all year long and you can add as many finished projects as you want! 
The same link party will be shown on the SYS2015 page.
Each link will give you a chance to win one of the monthly prizes.

For this month in order to be eligible for prizes, you are asked to make a pixel project of any size and any design!

For the first entry, you can enter the piece in the stage of a finished top piece (so just with all your squares assembled). For a second entry, you can enter a completed object: it can be a bag (as suggested in the tutorial) or any other object. For example you can use Janeen's tutorial to turn your pixel project into a pillow, or the tutorial I suggested to turn it into a fabric box!). 

Get creative and have fun!!

You can still link up blocks and projects from the Foundation Paper Piecing, Quilting and Crochet tutorials!!
For rules about what will be accepted in those cases, please refer to this previous post (Tutorial 1)this other post (Tutorial 2) and this other post (Tutorial 3).

This month the prize is offered by me and it is...

Mystery! Surprise ;)
It will be something related to crafts that we did or we will do in the series. 
Things that the winner could put to good use!! 

I will draw a winner (using random.org) on June 3rd between all the new entries in the link party. 
International participants are welcome!!

Saturday, May 23, 2015

MIA - Will be back soon :)

I don't know if anyone noticed, but I have been Missing In Action for a while :)

Mother-in-law staying in our home means no time for sewing ;) however I had time to do some crochet and I had great progress in my sampler tapestry crochet blanket that I will call "Mirror Mirror" :)

But before showing you my assessment of tapestry crochet and my blocks, let me remind you that the the voting for the Blogger's Quilt Festival is open!!

These are my quilts (Scrappy and Small)... please go there and give them some love <3 <3<3


--

And now a little summary of my new crochet project.

I am obsessed with the technique of tapestry crochet and I want to make myself a "sampler" afghan. But first I have to figure out what I like and how it looks like :) so I designed a little pattern and decided to stitch it with different methods. Then I will evaluate the results and pick the one I like the most for the afghan.

So this is the design. It is pretty simple but it has several key components (curves, sharp points, narrow strips, full shapes).

My tapestry block design... and my helper helping out ;)

First try: all SC, turning the work after each row

(Dimension: 5'' x 5.5'')
Assessment:
  • I like the texture: it's tight and full and a little too heavy
  • it's simple and works out pretty quick
  • since SC is not the same front/back, there are some issues on the edges where color changes
  • for the same reasons, sharp points (1 SC) are not so precise. The same issue can be seen for the narrow strips (both vertically and horizontally)

Second try: all Half Double Crochet, turning the work after each row
(Dimension: 6''x 8'' estimated)
Assessment:
  • I like the fact that is less heavy but still with a full look
  • it's simple and works out pretty quick
  • same issues as before on color changing spots and narrow strips
  • even if I like the fact that is more loose than the other version, HDC are too tall and the design is completely stretched


Third-forth try:
  * (lower half) HDC right->left and SC left->right (no turning)
 
(top half) SC right->left and SC left->right (no turning)
(Dimension: (lower) 6''x 8'' estimated, (upper) 5.5'' x 5.5'' estimated)
Assessment:
  • I like the fact that the texture is good and now I don't have issues where color changes and with narrow strips
  • I am very slow working with my left hand. And even if the final look is nice and I may get faster with practice, if I pick this approach I may get frustrated after few blocks and never finish the afghan

Conclusion:

I like the speed of the simple SC turning at each row. I am ok with "imperfect" lines when the color changes as long as I can finish my afghan in a reasonable amount of time.
However I want blocks to be a little bigger than 5''... so the solution is simple: I will use a bigger hook, the biggest I have around (K) :)

--

Having resolved the "how" now I wanted to design the "what". My idea is to make sampler blocks with my own designs. Each block will be done in two versions, switching the background/main colors (hence the name "Mirror Mirror" :) ).
These are my first blocks.


I really like how they look! If anyone is interested in the pattern, just comment below with your email address and I can send the graph to you.

--
I will be back next week with the usual link party and hopefully some sewing to share ;)

Wednesday, May 20, 2015

SYS 2015 - Pixel quilt: My project and few extra tips


At the beginning of the month Susan shared an amazing tutorial for a pixel bag to stretch your skills in stitching small squares :).
You can find the tutorial on the SYS2015 page!


And my project status is... not completed :( a visitor in our home means no sewing time... but I completed the blocks and outside of the bag about a month ago so I can share that with you with few extra tips! ;)

Bub and Bob from Bubble Bobble arcade game!
CLICK HERE to get my pattern for them! :)

So now let's get down to the EXTRA TIPS.
My situation was this: I finished the main blocks (square as above) and to make the bag I needed the extra 3 columns on the sides and the extra 3 rows on the bottom (if you checked the tutorial you know what I am talking about).
Now, I didn't want the black background to be scrappy as above, so I told myself: what is the purpose of cutting 216 squares of the same black fabric and 144 of the same red fabric only to put them back together??!?!?
So my idea was simple... don't cut them ;)
I wanted to keep the same look of the rest of the bag so I cut the biggest section for each color and I used the same sewing-on-paper technique as before, but with fewer pieces of fabric!
Below you can see how it looks when I stitched the long vertical seam on both pieces.


Now to sew the other seam, if you want the left and right side to "nest" you cannot get it just by pressing because they come from the same piece of fabric. To solve that issue, you can snip the piece from the fold to the seam (make sure not to cut through the seam line). And that's it! You can sew them following the directions in the tutorial and you will get the additional pieces with pixellated look without the need to cut 360 small squares! 

A fair warning: this technique works only for big sections filled with the same color and same fabric. Otherwise cutting sections of different sizes would take more time than cutting many squares of the same size!
--
And what are YOU making? Let's get the party started!!

Remember that in this link party only projects belonging to the SYS2015 series should be added 
(I reserve the right to delete any non compliant link). 
This link party will be open all year long and you can add as many finished projects as you want! 
The same link party will be shown on the SYS2015 page.
Each link will give you a chance to win one of the monthly prizes.

For this month in order to be eligible for prizes, you are asked to make a pixel project of any size and any design!

For the first entry, you can enter the piece in the stage of a finished top piece (so just with all your squares assembled). For a second entry, you can enter a completed object: it can be a bag (as suggested in the tutorial) or any other object. For example you can use Janeen's tutorial to turn your pixel project into a pillow, or the tutorial I suggested to turn it into a fabric box!). 

Get creative and have fun!!

You can still link up blocks and projects from the Foundation Paper Piecing, Quilting and Crochet tutorials!!
For rules about what will be accepted in those cases, please refer to this previous post (Tutorial 1)this other post (Tutorial 2) and this other post (Tutorial 3).

This month the prize is offered by me and it is...
Mystery! Surprise ;)
It will be something related to crafts that we did or we will do in the series. 
Things that the winner could put to good use!! 

I will draw a winner (using random.org) on June 3rd between all the new entries in the link party. 
International participants are welcome!!

Friday, May 15, 2015

Blogger's Quilt Festival - Scrappy Quilt - Spring 2015

Gorgeous quilt, donated by Alida (tweloquilting.blogspot.com). Quilted by Marge, bound by me. Going to thelinusconnection.org on Saturday. #charityblanket #blanketcharity #quiltforgood
Dimensions: 40''x60''
Quilts for Linus, Charity Donation
Picture by Jennifer

This is my second entry for the Blogger Quilt Festival, Scrappy Quilt!
First entry here (small quilt).


If you are new around here, WELCOME!
If you have been around for a while, THANKS AND WELCOME BACK! :)

--
If you are new around here, let me just point you to my main addiction: designing and sharing for free tons of paper piecing patterns :)


As you can see from one of my old headers arrangement, I design patterns for Disney characters, Peanuts and Snoopy, Downton Abbey, Alice in Wonderland but I have many many more (Maleficent, The Simpsons, Mickey Mouse, Donald Duck, Betty Boop, Minions and more)!! Some of them have to be tested, some of there are tested. You can find them just navigating the different tabs or just typing the character name in the search box at the top of the page.

And my other recent endeavor is SYS 2015 (Stretch Your Skills): a monthly series of tutorials to practice in different crafts skills. Until now we had Foundation Paper Piecing, Quilting, Crochet and Pixel Quilt.


If you want to know more about the series, check out the Series Page. Links to the tutorials are there... and did I mention that you can link projects for monthly prizes? Just saying... ;)

--

Gorgeous quilt, donated by Alida (tweloquilting.blogspot.com). Quilted by Marge, bound by me. Going to thelinusconnection.org on Saturday. #charityblanket #blanketcharity #quiltforgood

Quilt number two, made by Alida (tweloquilting.blogspot.com), quilted by Marge, bound by me. For donation to thelinusconnection.org. #blanketcharity #charityblanket #quiltforgood
Pictures by Jennifer

Ok, technically the quilts are two :) but I made them together and they share the story so here it is.

All the paper pieced blocks were made by me using scraps of all size, shape and color!
That was the only rule that I gave to me for these quilts: no new fabric, only fabric from my stash and first I had to use the scraps of weird shape and size ;)

I pieced most of the blocks (except from the owls, all those are applique blocks I received in a swap last year).

The blocks are designed by many different designers: Jennifer @ sewhooked, Esther @ ipatchandquilt, Jessica, Lilja, Janeen @ quiltartdesign, Kristy, Lorna @ sewfreshquilts  (if you are interested in a particular one, just let me know, I can send you the direct link).

I pieced the quilt tops and then I send them over to Jennifer (sewhooked) to finish them up and donate them to her favorite charity (The Linus Connection, a Central Texas organization whose mission is to make and deliver handmade security blankets for children in crisis situations in that area. The blankets go to children in hospital emergency rooms, in crisis centers, in foster care, battered women's shelters, to any child who is in need of a little extra security in their lives).

So thanks to Marge (who quilted them) and Jennifer (who bound them) I can count those as finished and share them as scrappy quilts for the festival!

If you have any comment about these quilts, I would love to hear!!!
And  check out more wonderful scrappy quilts over at blogger's quilt festival!!


Blogger's Quilt Festival - Small Quilt - Spring 2015

Dimensions: 30''x48''
(unnamed)

This is my first entry for the Blogger Quilt Festival, Small Quilts!


If you are new around here, WELCOME!
If you have been around for a while, THANKS AND WELCOME BACK! :)

--
If you are new around here, let me just point you to my main addiction: designing and sharing for free tons of paper piecing patterns :)


As you can see from one of my old headers arrangement, I design patterns for Disney characters, Peanuts and Snoopy, Downton Abbey, Alice in Wonderland but I have many many more (Maleficent, The Simpsons, Mickey Mouse, Donald Duck, Betty Boop, Minions and more)!! Some of them have to be tested, some of there are tested. You can find them just navigating the different tabs or just typing the character name in the search box at the top of the page.

And my other recent endeavor is SYS 2015 (Stretch Your Skills): a monthly series of tutorials to practice in different crafts skills. Until now we had Foundation Paper Piecing, Quilting, Crochet and Pixel Quilt. 

If you want to know more about the series, check out the Series Page. Links to the tutorials are there... and did I mention that you can link projects for monthly prizes? Just saying... ;)

--
And now, back on the project for the festival ;)


The whole project started as the "Tea Towel Challenge" (@ sophie junction).
So I got the tea towel and I used it as the center piece. Then I reproduced the motif in the main design as paper piecing border around it.
And then the amazing Jennifer (@sewhooked) started her BOM (Paper Piecing Vintage).
So I decided to merge the two and not following any of their rules I made my own ;)
So I didn't follow Sophie's deadline, nor Jen's layout, but I really love how it turned out!!

Few notes on the finishing touches:
  • I was super afraid of quilting it. Because I decided to do something I never do: use all-over designs not connected to the piecing. I was afraid that my bad skills in quilting and in picking desings would have ruined the piecing. But overcoming my fears I did it anyway and I realized that even if I used cream thread, it doesn't stand out against the blue! It just give a different texture! So fear of all-over designs is over!! :)
  • I tried a nice and simple motif shared by Susan a few weeks ago. I used a simplified version and tried it with two different scales. I used my walking foot to quilt this and I really like how it's soft and subtle, but interesting. This is definitely something I am going to use again!
  • Confident about the previous design, I wanted to try a more complex one in free motion. So I picked Deco Leaves by Leah Day. I hated the entire process! The stitching was super hard, frustrating, nothing was working, I kept getting stuck because of bulky seams, the stitches were super inconsistent, I broke one needle, I hated quilting, I hated my life, I hated everything while I was doing that :) ok, once I stop stitching this section, I went back to my normal status of loving my life and sewing ;) but I guess you understand the spirit. Despite the messiness of the process and my opinion on the design (too dense for my taste), it didn't turn out too bad after washing... I can barely see it, so this is just a lesson for me: never ever ever ever again try to FMQ on a pieced  block :) if all the seams are open or on a blank piece of fabric, maybe...
  • Because I didn't want to repeat the same design that gave me so much trouble, I started doing some tangles borders on my notepad and came up with this simple design which I absolutely love! I stitched it with my walking foot, so a lot of turning, but not too bad since the design is pretty small and I didn't need to turn the whole quilt most of the time. This is another design that I will definitely use again!!
  • I absolutely love the 2 colors (piped) binding but I struggled joining the sections at the end. Again Susan came to the rescue with a great tutorial! Absolutely perfect joining, if I didn't know where it is I wouldn't even being able to tell (hint: it's in one of the picture, but not in this one)!! ;)
  • Finally, since this is a wall hanging that I wanted to hang on the wall I tried to put a sleeve on! First sleeve ever and, guess where I find help for that: right, Susan again with a simple hanging sleeve tutorial!
This is one of my few finishes, and I am very happy I could share it with all of you today!!
If you want to check out more wonderful small quilts, check out the blogger's quilt festival!!

If you have any comment, I would love to hear!!!
If you want to suggest a name for it, that would be great ;)

Wednesday, May 13, 2015

SYS 2015 - New prize announced (kind of)


Last week Susan shared an amazing tutorial for a pixel bag to stretch your skills in stitching small squares :).
You can find the tutorial on the SYS2015 page!


My project is almost done, and I have few other tips, learned after we put together the tutorial ;) 
I will share those with you next week (with maybe also my finished project... not sure, let's see)!

But what are YOU making? Let's get the party started!!

Remember that in this link party only projects belonging to the SYS2015 series should be added 
(I reserve the right to delete any non compliant link). 
This link party will be open all year long and you can add as many finished projects as you want! 
The same link party will be shown on the SYS2015 page.
Each link will give you a chance to win one of the monthly prizes.

For this month in order to be eligible for prizes, you are asked to make a pixel project of any size and any design!

For the first entry, you can enter the piece in the stage of a finished top piece (so just with all your squares assembled). For a second entry, you can enter a completed object: it can be a bag (as suggested in the tutorial) or any other object. For example you can use Janeen's tutorial to turn your pixel project into a pillow, or the tutorial I suggested to turn it into a fabric box!). 

You can still link up blocks and projects from the Foundation Paper Piecing, Quilting and Crochet tutorials!!
For rules about what will be accepted in those cases, please refer to this previous post (Tutorial 1)this other post (Tutorial 2) and this other post (Tutorial 3).

This month the prize is offered by me and it is...
Mystery! Surprise!
It will be something related to crafts that we did or we will do in the series. 
Things that the winner could put to good use!! 

I will draw a winner (using random.org) on June 3rd between all the new entries in the link party. 
International participants are welcome!!

Thursday, May 7, 2015

My Tangle Thursday - Week 15, 16, 17

I don't know if anyone noticed... but I had a break in my Tangle Thursdays :)

The first reason was because Jane had a break herself for few weeks... and then she published all the designs in one go and I wanted to catch up a little bit before sharing again ;)

So here are Week 15, 16, 17. Week 18 is out but I didn't start on that yet!


I really like this last one (stacked tangles) because even if each section is completely different than the one next to it, they maintain a coherent and fun overall look.


UA-37918212-1